Creating a ZKML model with Bionetta
In this tutorial, you'll learn how to build a simple ZKML model that recognizes handwritten digits. This model enables users to prove they've presented a specific handwritten digit (e.g., "7") without revealing the original image. We'll train the model with TensorFlow using the MNIST dataset and then compile it into a ZKML-compatible format using the Bionetta framework.
Prerequisites
Bionetta is currently in an active development phase, and the implementation is currently private. Contact us on Telegram to get early access to the framework.
To get started, clone the bionetta repository that contains the Bionetta framework and the example MNIST model:
git clone [email protected]:rarimo/bionetta.git
Then, install the required dependencies:
- Node.js
- Python 3.11
- TensorFlow 2.12
- Rust 1.84+
- Circom 2.1.7
- Snarkjs
Refer to install.sh script for the complete list of dependencies and installation instructions.
Recipe to build your own ZKML model
Running Bionetta Framework is as easy as writing an init script in Python with the following steps:
- Preparing the dataset
- Building a TensorFlow model with the layers supported by Bionetta
- Training the model
- Compiling ZK circuits using Bionetta with just one single extra line:
model.compile_circuits(*)
Then you should run this script and wait till the end of the process. After running the script everything would be ready to build your own ZKML model.
Step 1. Training the model
We will start from the only part that could need the user's efforts: model training and writing an init script mentioned above. Since you are here, we assume that you are familiar with the basics of neural network training.
Each neural network training is based on some previously prepared dataset. Because each dataset has unique properties, this step must be performed by the user. For example, we give you a piece of code below, which parses the MNIST dataset:
(X_train, y_train), (X_test, y_test) = tf.keras.datasets.mnist.load_data()
X_train = X_train / 255.0
X_test = X_test / 255.0
X_train = np.expand_dims(X_train, axis=-1)  # Add channel dimension
X_test = np.expand_dims(X_test, axis=-1)  # Add channel dimension
y_train = tf.keras.utils.to_categorical(y_train, 10)
y_test = tf.keras.utils.to_categorical(y_test, 10)
After that you should create model by using layers supported by Bionetta Framework. This model then should be put into the init script as Tensorflow model. Here we present you a small example of such neural network:
model = tf.keras.models.Sequential(
    [
        tf.keras.layers.Input(shape=(28, 28, 1)),
        tfb.layers.EDLight2DConv(
            7,
            16,
            hidden_units=16,
            kernel_output_size=3,
            activation=tfb.layers.ShiftReLU(3),
        ),
        tf.keras.layers.Conv2D(32, 3, activation=None, padding="same"),
        tfb.layers.SEHeavyBlock(6, hidden_units=32, activation=tfb.layers.ShiftReLU(2)),
        tf.keras.layers.Conv2D(64, 3, strides=2, activation=None, padding="same"),
        tfb.layers.EDLight2DConv(
            2,
            128,
            hidden_units=16,
            kernel_output_size=3,
            activation=tfb.layers.ShiftReLU(3),
        ),
        tf.keras.layers.GlobalAveragePooling2D(),
        tf.keras.layers.Dense(128, activation=None),
        tf.keras.layers.Dense(10, activation=None),
    ]
)
After dataset preparation and constructing model architecture you can describe how your training should go. Obviously if you already have trained weights you can put them to the weights directory and skip the training part of SDK. Our repository also contains such example of using Bionetta Framework.
hyperparams = tfb.hyperparameters.TrainingHyperparameters({
    'epochs': 1,
    'validation_split': 0.9
})

DEBUG_BATCH_SIZE = 4
random_idx = np.random.randint(len(X_train), size=DEBUG_BATCH_SIZE)
X_debug = X_train[random_idx]
y_debug = y_train[random_idx]

callbacks = [
    tfb.callbacks.BionettaSubmodelCheckpoint(
        model, "./examples/bionetta_mnist_test_model/training"
    ),
    tfb.callbacks.ExamplePredictionsCallback(X_debug, y_debug),
]

model.save_circuit_weights('./bionetta-mnist-temp', compress=False)

model.compile(loss='mse', optimizer='adam')
model.fit(X_train, y_train,
          epochs=hyperparams.epochs,
          validation_data=(X_test, y_test),
          validation_split=hyperparams.validation_split,
         callbacks=callbacks)
The last part of your actions will be to add code for compiling ZKML:
test_input = X_test[np.random.randint(len(X_test))]

model.compile_circuits(
    path='./examples/bionetta_mnist_circuits',
    test_input=test_input,
    powers_of_tau_path='./examples/powersOfTau_20.ptau'
)
To train the model and execute the Bionetta framework, run this script and wait till the end of the process:
python3 -m examples.bionetta_mnist
After running the script, you will see the following output:
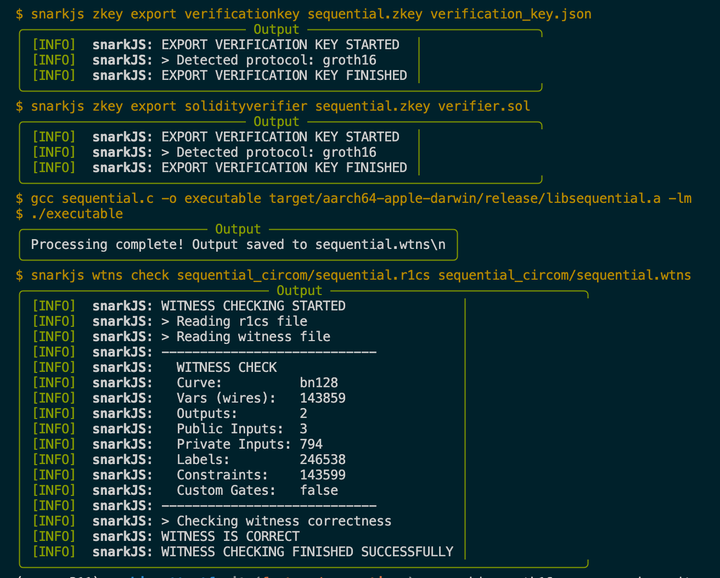
Step 2. Proving and verifying inference
After running Bionetta, you will find the following files in the examples/bionetta_mnist_circuits directory:
.zkeyfile keeps data received by running trusted setup for your circuit. It holds all the pre computations needed to construct Groth16 proof. In future such file is used to create proof for your witness.bionetta-witness-generatorexecutable and library for C..wtnsfile keeps witness for your circuit. It is a file that contains all the information about the input to your neural network and the output of the neural network.verification_key.jsonfile with the verification key for your circuit.verifier.solSolidity verification contract
Proving
To generate a proof for the inference, you need to run the following command:
snarkjs groth16 prove \
    examples/bionetta_mnist_circuits/sequential_circom/sequential.zkey \
    examples/bionetta_mnist_circuits/sequential_circom/sequential.wtns \
    proof.json public.json
This command will use a random image from the test set as input to the neural network. The proof.json file will contain the proof, and the public.json file will contain the public inputs to the circuit.
Also .wtns and .zkey file are compatible with Rapidsnark, so it is also possible to use it for proof generation. I would personally say that it is even preferable, because Rapidsnark generates proofs much faster than snarkjs command.
Verification
To verify the proof generated in the previous step, run the following command:
snarkjs groth16 verify \
    examples/bionetta_mnist_circuits/sequential_circom/verification_key.json \
    public.json proof.json
If everything was done correctly you will receive the following result:
[INFO] snarkJS: OK!
Proving and Verifying in Python
Alternatively, you can generate proofs and verify them directly from your Python script using Bionetta's built-in methods.
To generate a proof for a given input and then verify it:
proof_dir = './examples/simple_mnist_circuits/proof'

model.prove(
    input=test_input,
    target_dir=proof_dir
)

model.verify(proof_dir=proof_dir)
This will create the proof files in the specified proof_dir and then attempt to verify them.
Conclusion
In this tutorial, we have shown you how to create a simple ZKML model using the Bionetta framework. We covered the steps of preparing the dataset, building and training the model, compiling ZK circuits, and generating and verifying proofs. With Bionetta, you can easily create privacy-preserving models that leverage the power of zero-knowledge proofs.